Go Advent Day 5 - An introduction to beego
An introduction to beego
Beego is an open-source, high-performance and lightweight application framework for the Go programming language. It supports a RESTful router, MVC design, session, cache intelligent routing, thread-safe map and many more features that you can check out here.
This post will give you an overview and get you started with the beego framework.
Overview
The goal of beego is to help you build and develop Go applications effectively in the Go way. Beego integrates features belonging to Go and great mechanisms from other frameworks; in other words, it’s not a translated framework, it’s native and designed only for Go.
Beego also uses a modular design and thus gives you the freedom of choosing which modules you want to use in your applications and leave alone useless ones for you.
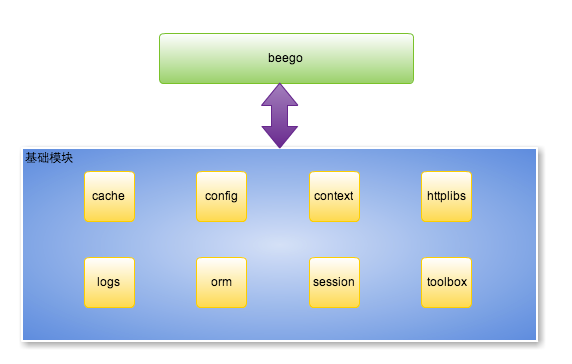
The following figure shows 8 major modules of beego:

And here is the classic organization of projects that are based on beego:
1 2 3 4 5 6 7 8 9 10 11 12 13 14 15 16 |
├── conf
│   └── app.conf
├── controllers
│   ├── admin
│   └── default.go
├── main.go
├── models
│   └── models.go
├── static
│   ├── css
│   ├── ico
│   ├── img
│   └── js
└── views
    ├── admin
└── index.tpl |
When you develop with beego, the Bee tool will give great convenience features, like hot compile for your code.
Getting started
Installation
Beego contains sample applications to help you learn and use beego App framework.
You will need a functioning Go 1.1 installation for this to work.
Beego is a “go get” able Go project:
1
|
go get github.com/astaxie/beego |
Or through gopm by executing
1
|
gopm get -gopath github.com/astaxie/beego |
You may also need the bee tool for developing:
1
|
go get github.com/beego/bee |
or
1
|
gopm bin -dir github.com/beego/bee $GOPATH/bin |
For convenience, you should add $GOPATH/bin into your $PATH variable.
Your first beego application
Want to quickly setup an application see if it works?
1 2 3 4 |
$ cd $GOPATH/src $ bee new hello $ cd hello $ bee run |
These commands will help you:
Install beego into your $GOPATH.
Install Bee tool in your computer.
Create a new application called “hello”.
Start hot compile.
Once it’s running, open a browser and point it to http://localhost:8080/.
Simple example
The following example prints string “Hello world” to your browser, it shows how easy to build a web application with beego.
1 2 3 4 5 6 7 8 9 10 11 12 13 14 15 16 17 18 |
package main import ( "github.com/astaxie/beego" ) type MainController struct { beego.Controller } func (this *MainController) Get() { this.Ctx.WriteString("hello world") } func main() { beego.Router("/", &MainController{}) beego.Run() } |
Save file as hello.go, build and run it:
1 2 |
$ go build -o hello hello.go $ ./hello |
Open address http://localhost:8080/ in your browser and you will see “hello world”.
What is happening in this example?
We import package
github.com/astaxie/beego. As we know that Go initialize packages and runs init() function in every package (more details), so beego initializes the BeeApp application at this time.Define controller. We define a struct called
MainControllerwith a anonymous fieldbeego.Controller, so theMainControllerhas all the methods that abeego.Controllerhas.Define RESTful methods. Once we use anonymous combination,
MainControllerhas already hadGet,Post,Delete,Putand other methods, these methods will be called when user sends corresponding request, likePostmethod is for requests that are using POST method. Therefore, after we overloadedGetmethod inMainController, all GET requests will useGetmethod inMainControllerinstead of inbeego.Controller.Define main function. All applications in Go use main function as entry point like C does.
Register routers, it tells beego which controller is responsibility for specific requests. Here we register
/forMainController, so all requests in/will be handed toMainController. Be aware that the first argument is the path and the second one is pointer of controller that you want to register.Run application in port 8080 as default, press
Ctrl+cto exit.
Going further
The official website of beego contains all the information you may need, and the documentation page is made as an open source project so that you can open issues for requesting more details or pull request and be a part of the community. To follow up news of beego, keep your eyes on our blog.
