
Promoting the Quality and Collaboration of Your Open Source Project
So your open source project is on GitHub. It has tests, an awesome logo, probably a few stars, and maybe even a few other contributors. To spread awareness, it might be shared on the relevant subreddit, Twitter, Hacker News, etc.
While exposure is one of the most effective ways to promote a project, there are various steps that can be taken to ensure that its growth is positive and that the community it revolves around thrives.
This post includes suggestions which promote code confidence and collaboration. They are:
1. Gitter
Gitter describes itself as, “a chat and networking platform that helps to manage, grow and connect communities through messaging, content and discovery.”
This platform provides a direct resource to the community which can be as simple as clicking a link within a project’s README.md and signing in via Github. No sign up necessary, no client to download.
The great people behind Gitter have made the free version wildly useful, allowing for unlimited chat history, integrations, and public/private rooms. The premium versions provide even more capabilities, from analytics and promotional tools to room customization.
Adding Gitter to Your Organization or Repository
Creating a Gitter community for your repo can be done right from the front page of the website. First, sign in via Twitter or Github, then choose a name for the community.

There is an option to attach the new community to a Github Organization or Repo (a selection based on the login credentials used) towards the bottom of the same page.
In addition to autocompletion of the community name and link, another benefit is an option to automagically create a PR to update the README with a badge. Sadly, this didn’t work for me in the multiple communities I’ve created.
Invites to join your community can be sent by email or from a list of Github followers. After the community is created, an invite can be sent via other platforms such as Facebook, Twitter, LinkedIn, and Google+.
Manually adding a Gitter Badge to a README

Shields provides a slick Gitter badge (repo here). Make the necessary substitution below, then update the README to include this badge which directs users to any desired Gitter community:
1
|
[](<YOUR GITTER COMMUNITY URL HERE>) |
Notable Gitter Communities
Gitter’s recommended communities has been pretty useful to me. I was able to find a surprising number of communities for tools, projects, and packages that I consider myself pretty familiar with. Here’s a few:
2. Go Report Card

Go Report Card is a product of the 2015 Gopher Gala hackathon. Created by Shaun Smith and Herman Schaaf of gojp, the Go Report Card is a convenient and powerful tool which validates an open source repo in multiple aspects, from running Go specific tools against the repo such as go vet, go lint, and ineffassign, to general details such as checking misspelling errors and the inclusion of a license.
Adding a Go Report Card badge to a project and seeing the A+ is pretty satisfying, and it makes a strong statement for a repo’s quality and credibility.
Individuals familiar with the badge are incentivized to do more digging than just scrolling through the README. There’s more of a serious interest to inspect the code and play around, which leads to usage, and best of all, contributions!
Creating a Report Card
To add a badge and generate a Report Card in one step, skip to the next section.
Creating a Report Card page for a repo is straightforward. One method is to type in the go get path on the Go Report Card homepage. Another method is to navigate to the following link with the go get path substituted (the first method does the same thing):
1
|
https://goreportcard.com/report/<YOUR GO GET PATH HERE> |
Adding a Badge
Make the necessary substitution to the following markdown content which adds a badge:
1
|
[ |
Once the markdown content has been added to a desired README or markdown page, the badge will redirect anyone who clicks on it to the repo’s Report Card page.
3. GoDoc
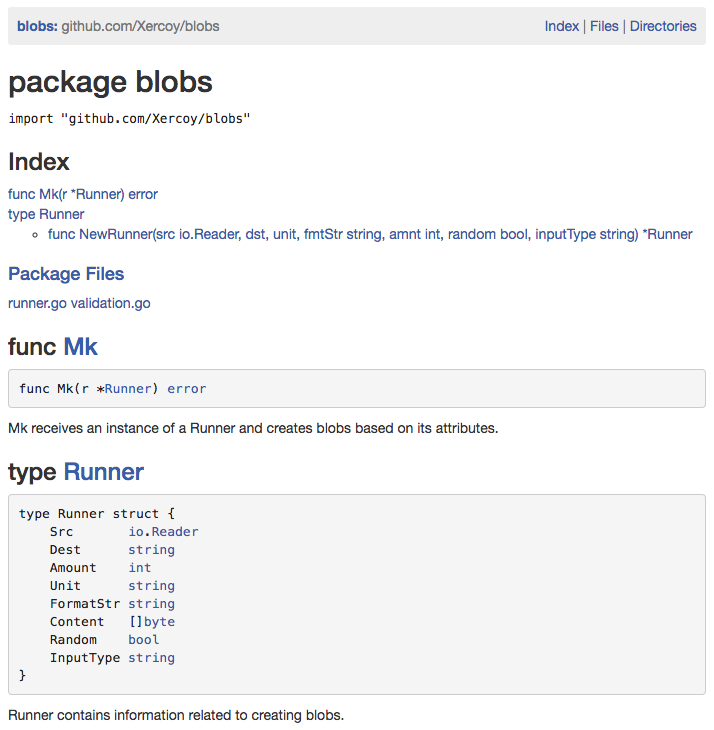
GoDoc hosts and generates documentation from Go source code on Bitbucket, Github, Google Project Hosting, and Launchpad. This resource makes unfamiliar code much more digestible, a detail that is paramount to anyone who is using a package or just trying one out. The effectiveness of the page generated by GoDoc is similar to the package documentation from golang.org.
Since the documentation is generated directly from source code, there are guidelines which should be followed to ensure proper output.
Creating a GoDoc Page for a Repo
Like Go Report Card, a page can be generated by entering the import path into the search textbox on the Godoc homepage.
Adding a GoDoc Badge to Your Repo

The tools page found at the bottom of every GoDoc documentation page provides information on the badge and markdown content which can be applied to a README, no substitution necessary. For quick reference:
1
|
[](https://godoc.org/<YOUR IMPORT PATH HERE>) |
Conclusion
While the three items listed above include badges, there are many other resources that can be utilized which do not. I’ve seen Slack channels, IRC channels, and dedicated subreddits used to support an open source project. No matter what the resource may be, the points to focus on are the collaboration of the community and the quality of the code.
Have any questions, feedback, or other useful suggestions? I’m on Twitter at @coreyprak or email at corey@prak.me.
Happy Coding!